- By: Mike LaLonde
- May 12, 2016
Migrating Website Scripts to Google Tag Manager
In my last post, I discussed how to develop an effective naming convention for Google Analytics tracking, keep it organized, and set up custom reporting to track your manual analytics events. So now that you’ve established everything that you’d like to track, we can discuss how to track those things.
In the past, you or your developer manually inserted the tracking codes where tracking was necessary. With Google Tag Manager (GTM), there’s now an easier solution. While it will take some work to successfully migrate all the work you’ve done in the past over to Google Tag Manager, the long-term benefits of using GTM outweigh the troubles caused with constant code manipulation.
Google Tag Manger has come a long ways the past couple years, and it is now a fairly robust solution to manage all your website scripts. Rather than troubling your developers with tedious implementations, you can now manage all the tracking you need directly from Google’s third party scripting solution. Here are the major benefits:
1) Update scripts without involving the development team (IT will like you)
2) Update scripts without editing website code (IT will like you)
3) Faster, easier, universal updates
4) Works with (most) custom CRM plugin modifications and automatic updates
5) Good for Agencies and 3rd Party Providers
6) More automated, less errors, more efficient
7) Flexibility (when tags will or will not fire)
8) Asynchronously deployed, thus improving website speed
Of course if you enjoy troubling your developers as much as I do, you can introduce some very advanced, granular tracking with custom metrics and dimensions that will take some custom implementation. There is a lot of additional potential with Google Tag Manager, and it’s important to emphasize what a scalable solution it is. So while hopefully you find all this worth it for some of the above reasons, realize that as your marketing and analytics efforts advance, you’ll be able to keep things organized, effective, and do some sophisticated marketing with GTM capabilities.
Step #1: Create Your Accounts & Install the Code
1) Create your Google Tag Manager account. Create an account at tagmanager.google.com with the name of your organization (or the organization you’re doing this for), and then create a New Container inside that account.

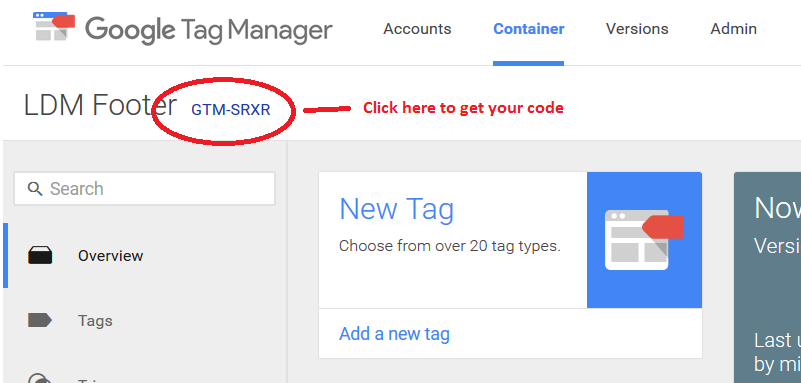
2) Place the code. The code will be given to you right after account creation, but you can also find it by clicking on the ID shown at the top of the page when you’re looking at your account. Paste it just after the opening “body” tag.
hint: For most WordPress sites, the <body> actually starts in the header.php file, so you can place it universally there. Some CMS’s don’t make it easy to put it right after the opening <body>. Just try to get it as close as you can to the top, while keeping it in the <body>.
Step #2: Create a Google Analytics property and Deploy GA code
1) Create a new Google Analytics property. We’re not going to try to do all this live. For testing purposes, create a new Analytics property that we’ll be able to use to test the Google Tag Manager code before setting it live. It will run parallel with your main Google Analytics account, so they should not impact each other.
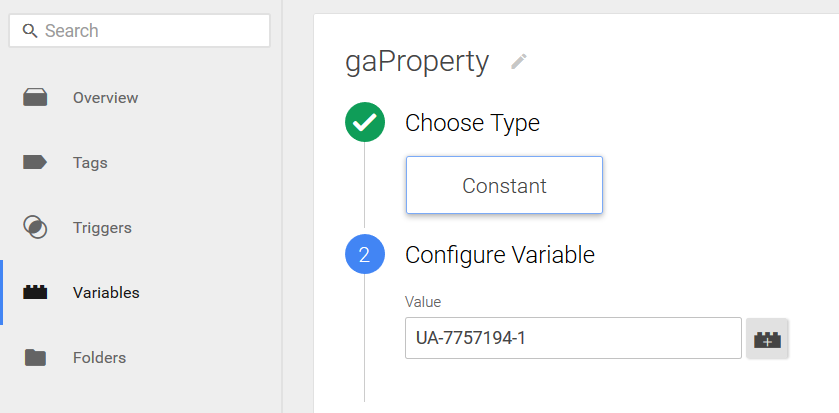
2) Create a new Variable in Google Tag Manager. Type=Constant, then in the Configure Variable section add the Google Analytics Property ID as the Value, e.x. UA-XXXXX-X. Remember, this is the ID of the new testing property you’ve created, not your live analytics ID. Name the variable “GA Property ID” or something like that (we called it gaProperty in the example below).
3) Add the GA Tag. Navigate to the “Tags” menu in the left of Google Tag Manager. Google Analytics is a built in product choice, which makes things easy. Call in Google Analytics, and select the Google Analytics graphic in step 1 (it’s the first one). The tag type is “Universal Analytics” unless you’re doing this in like 2008. For the “Configure Tag” in step 3, this is where you’ll select your “GA Property ID” variable. We check the enable advertising features box just in case we want to do that, but don’t worry about the rest of the options for now (keep the Track Type on “Page View”). For the “Fire On” in Step 4, simply select “All Pages,” then create your tag.

hint: We create and use the “GA Property ID” variable instead of manually entering in the Property ID so that when we want to change the Property ID later, we need only change the Variable value, rather than finding every tag that uses the GA Property ID and switching it manually.
4) Publish your container and verify that it’s working. You can check by comparing your basic data to the current analytics property. They should be pretty close, but there is some margin of error, plus you haven’t added your additional tracking yet. Just make sure the visits and/or sessions are close.
Step #3: List everything you’re currently tracking (and want to start tracking)
This previous post was about how to organize all of your Google Analytics and script activities that weren’t automatically generated by a Google Analytics pageview. If you’ve done that already, you’re off to a good start. If you haven’t, then do it now. Or at least write down a list of everything you’re doing on the site now. This should include:
- Virtual pageviews
- Events
- Conversion Scripts
- Tracking Scripts (Google Analytics, Facebook, ClickEgg, etc)
- E-commerce capabilities
- Custom CMS tracking
- Performance Testing
- Custom Dimensions
Keep track of not only WHAT you’re tracking, but also HOW you’re tracking it. You don’t want to change naming conventions with the tag migration. At best it’s annoying to look at comparison data, while at worst you’re going to have to redo automated actions, custom reports, dashboards, conversion tracking, and remarketing lists. Since that would be a pain, it’s probably best just to stick to your previous convention, assuming it’s done in an effective way.
hint: You can use a script detecting browser extension like Ghostery to help find scripts currently running on your site.
Step #4: Recreate current Google Analytics tracking scripts in GTM
Here we just want to get the test property that is using Google Tag Manager to match the data currently in your Google Analytics account. Why is this important? It will make sure your triggers and variables are working properly so when you implement other tagging scripts, you can do so with confidence. It’s a lot easier to troubleshoot on the Google Analytics side (which you can analyze in real time) and then push those learnings to other scripts than to do it the other way around.
In this step, you’ll want to make sure the following are working effectively on your new test property:
- Pageviews
- Virtual pageviews
- Events
- Conversion Tracking
- E-commerce Tracking
- Experiments
- Custom Dimensions
These can vary in difficulty, depending on your current website setup and the CMS you are currently employing. You might need to work with your development team for e-commerce implementations in particular. Custom Dimensions can be done in part directly in the GTM management area, but things start to get advanced here and you’ll probably want to bring your dev team in to help implement more advanced dataLayer objects if that’s functionality you want to use (or, of course, hire us!). For the majority of migrations, you’re just going to be working with the first 4-5 items on that list.
Event Example
Generally speaking, you aren’t going to get hung up on the Tag implementation of Google Analytics items. The options are all built in, so if you’re relatively proficient at following directions, you’ll be able to get through that portion. Here’s what an Event Tag might look like as you’re setting it up:
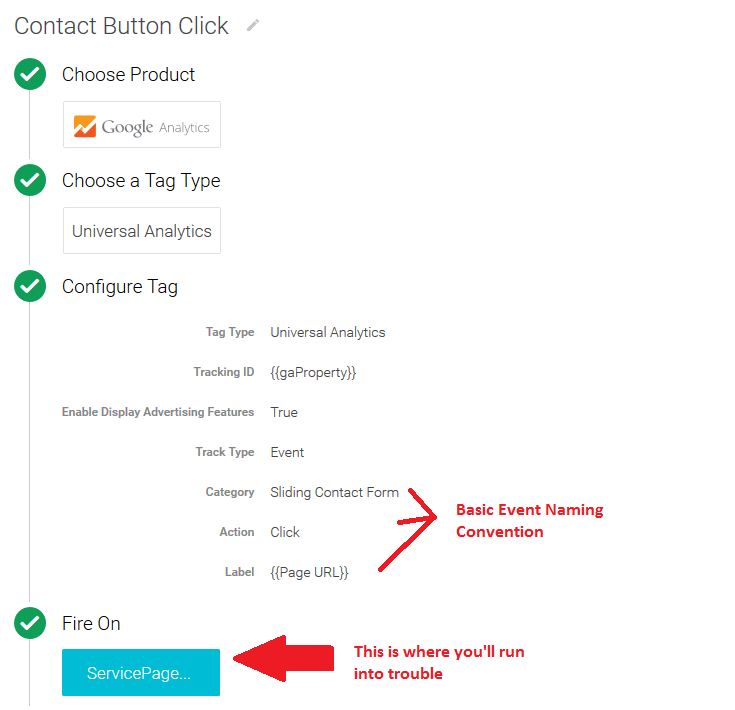
As noted above, the trigger is where you’re more likely to run into a problem. A basic knowledge of HTML can be helpful here. First, let’s take a look at a basic example of a button click event trigger:
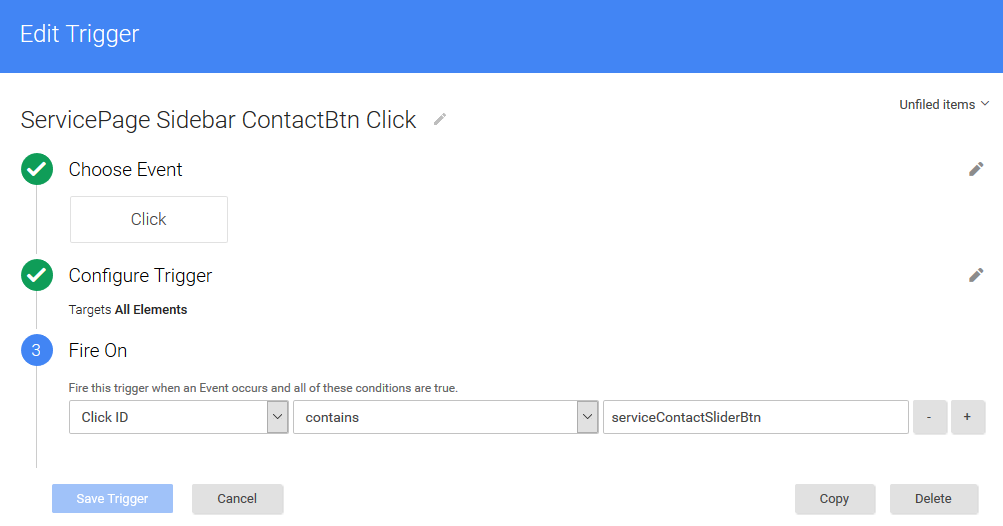
So the example above looks at the “Click ID,” but there are a lot of different ways to “trigger” the event. Your job is to specify a trigger that is both necessary and sufficient, but not so broad that it will register other events that you might be tracking. You’ll probably need to activate a few additional variables in order to have all the options you need, as the default set is fairly limited. Here’s a screenshot of our panel with a lot more of the built-in variables selected, and thus listed as available options when you go to create triggers.
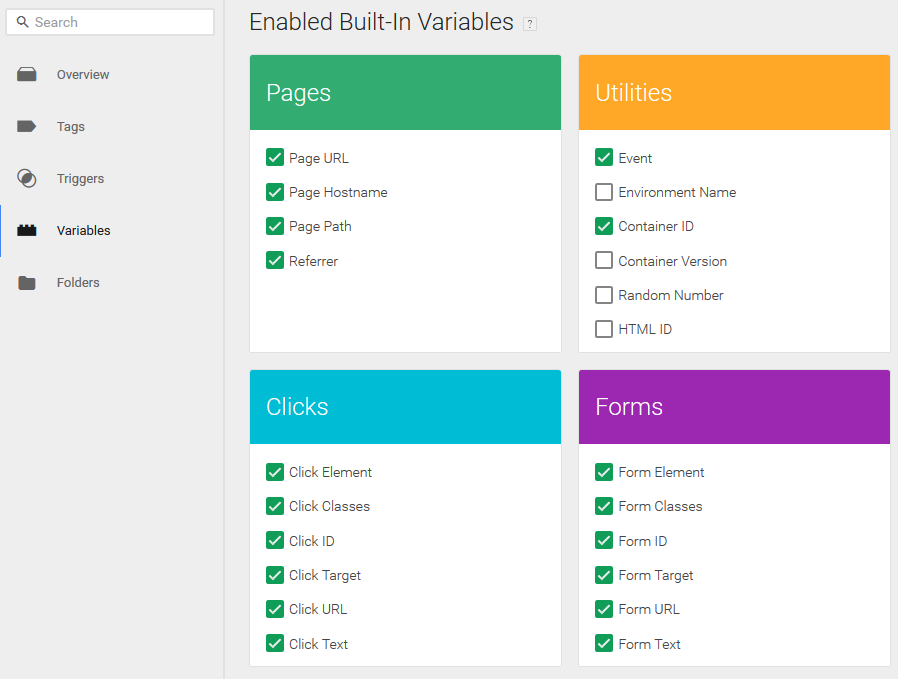
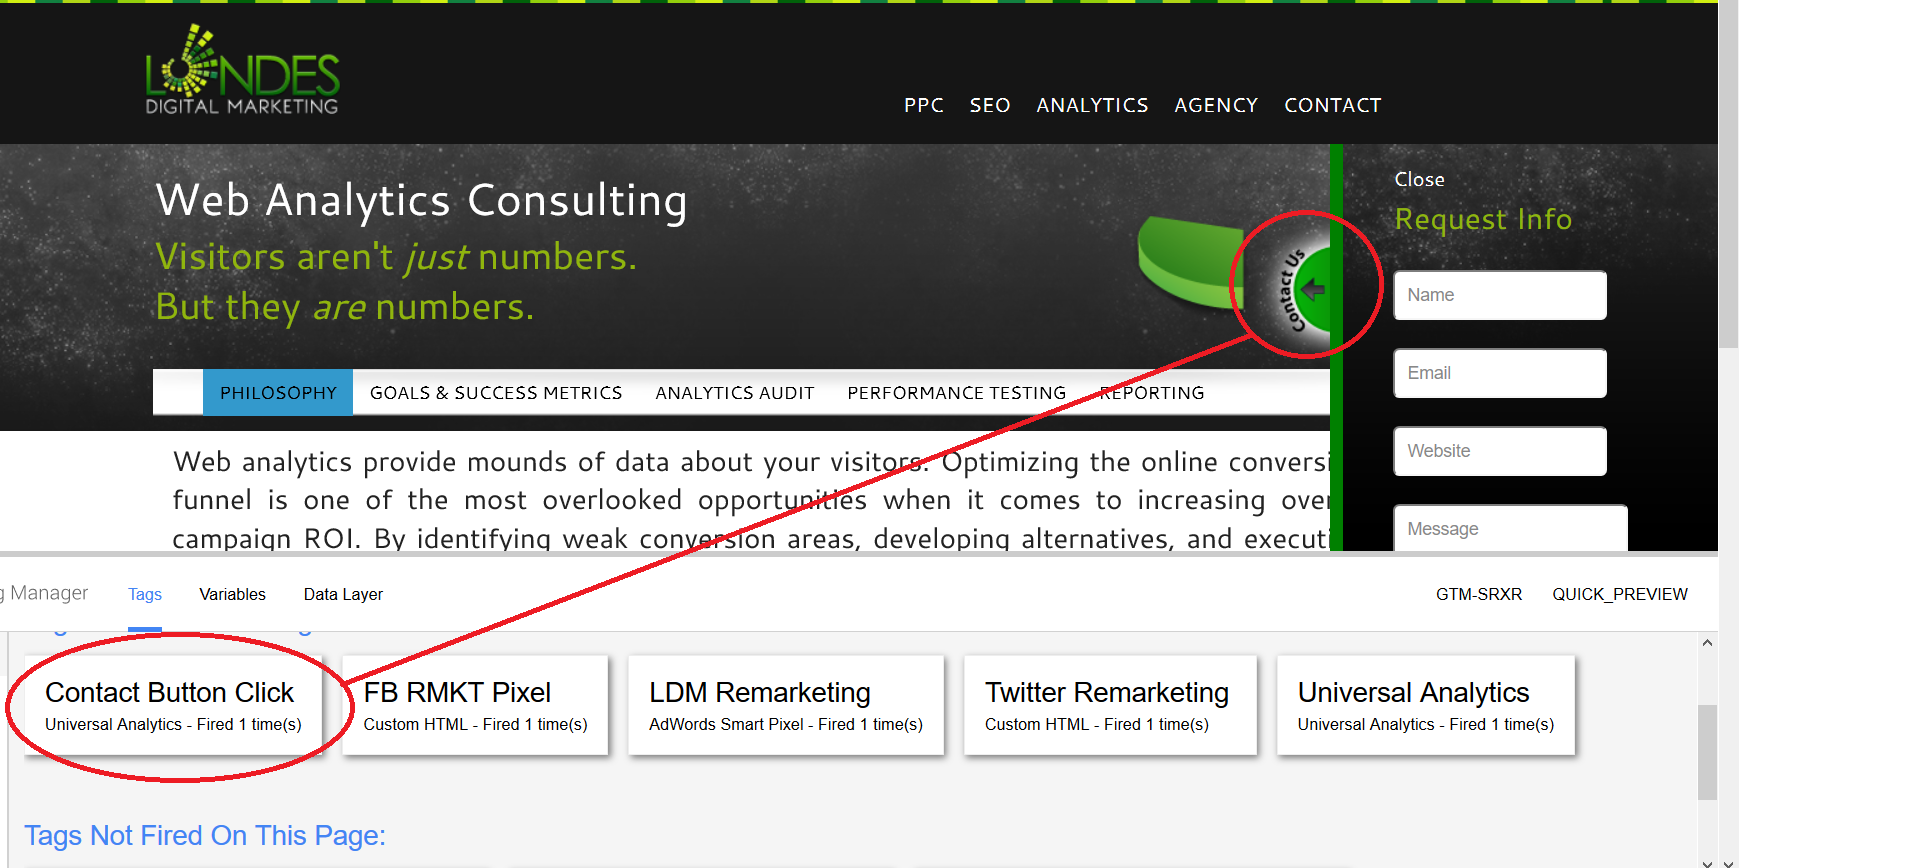
If you look at the source code of the button we’re trying to track, we could find the id=”XYZ” specified for that button. It appeared to just be used for that button set, so we felt safe specifying it as the trigger. We have the same button ID’s on pages for PPC, SEO, and Analytics, but we can share the same trigger for this button. In our event tracking area, we specified a dynamic value for {Page URL} so we can differentiate between where the clicks are happening. There are a few different ways to do this, but that’s how we chose to implement.
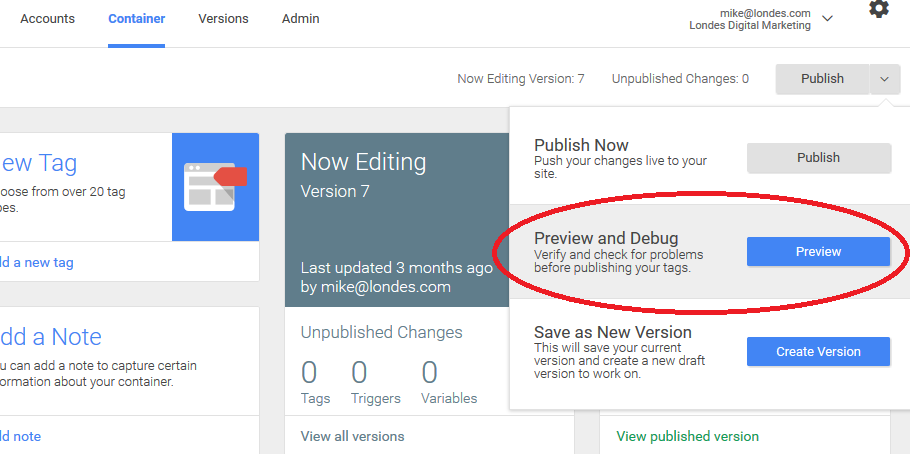
Want to check to see if your triggers have been set up properly? The preview and debug tool is your friend.
Follow the same general process for form fills and virtual pageviews that you want to implement. With form fills, you can specify to make sure they validate and are successfully submitted before firing the script, which is a box you’ll want to enable.
Try not to get frustrated. The triggers can be frustrating, especially when you’re trying to organize tracking on a website that didn’t use a very friendly naming convention on the programming side of things. You *may* need to bring in the developer to help you out here by changing/adding variables, but you can almost always find a way around it if you need to by combining multiple filters.
hint: Just recreate Google Analytics scripts in this step. You don’t want to double-serve conversion codes or tracking scripts from 3rd parties where you can’t verify they are working independently on a separate account. So keep it to just Google Analytics and save the rest for later.
Step #5: Verify data
Now your entire Google Analytics accounts should be nearly identical. Allow for a bit of margin of error, but by and large, all the same things should be tracking in your old account as your new test property. If they match, proceed! If they don’t, troubleshoot! Using Tag Manager can be a lot of troubleshooting, especially if you’re just getting started and doing some more advanced click and form tracking where coding elements haven’t been given a particularly friendly naming convention.
Step #6: Add additional tracking scripts
Now that you’re fairly confident in your Google Analytics deployment, you can start pushing all your other hard-coded scripts into Google Tag Manager. Don’t publish until you’re really ready to go live in order to prevent double-serving.
In all likelihood, if you’re setting up all your conversion tracking in Google Analytics and have done proper troubleshooting with the implementation, you should have acceptable triggers to apply to any kind of conversion scripts you want to run. It’s up to you whether you want to run separate conversions for different pages, or if you just want one conversion type you can always apply multiple triggers and just send a gross number of conversions. In other words, doing 1-to-1 conversions from each conversion point on your site to a unique conversion (many separate conversions in Google Adwords, for example), or doing a many-to-1 implementation where you just apply all your conversion triggers to one conversion code (one general Adwords conversion). We always prefer getting more granular when you can, but the flexibility is there with GTM, which is great.
So what else are you going to add? As of writing this, there are 31 tag integrations that make it really easy to add the code. Most of them involve just adding an account ID. For example, LinkedIn, AdRoll, ClickTale, and CrazyEgg are ones that can be implemented this way. Most of those will just be applied to “all pages” although you can of course select different triggers. However, if you don’t want to weigh down your site with excessive scripts, you can specify the pages you’re testing with ClickTale/CrazyEgg with a unique trigger (“Some Pages” in all likelihood) rather than putting it on every page, which should improve load time and technically be cleaner.

That same logic extends to “thank you” pages. If you’re using testing software like Unbounce which uses an external conversion, you can just trigger that code on your conversion actions, such as certain events or fire it when certain pages are visited.
Other networks such as Bing or Facebook need to be installed with the “Custom HTML Tag” area. It’s really not difficult at all, but Google doesn’t like people that compete with their breadwinner service I suppose, so it isn’t automated. Simply select “Custom HTML Tag” and paste your code in there. But both Bing and Facebook deploy a site-wide code – Bing with it’s UET tags and Facebook with its tracking pixel, and then require you to create goals within those platforms by specifying rules (typically a URL).
Step #7: Remove live scripts and change Analytics Property ID in GTM
Finally, you’re ready to go. You’ll want to execute these two steps as quickly as possible in order to prevent any lapse in tracking. It should basically be like flipping a switch.
1) Remove Live Scripts. That means all the scripts that you imported into Google Tag Manager. From conversion trackers to Google Analytics itself, if you’re using it in GTM now, it’s got to go. In theory the inline Google Analytics codes won’t really affect things, but it’s best to remove them to keep things clean.
2) Swap the property ID in Google Tag Manager. Your testing property was fun while it lasted, but you don’t need it anymore. Change that Variable Constant you created way back at the beginning of the process from the testing Property ID to the real Property ID you use for Google Analytics.
Then I usually sit there and watch the “Real-Time” setting in Google Analytics to make sure everything is working properly, because I’m paranoid. But I prefer to call it “quality control”.
If I’ve done a sufficient job confusing you, or if you’re interested in taking your tracking capabilities to the next level, contact us today about how we might be able to work together to optimize your conversion funnel!
RELATED SERVICES
RELATED CASE STUDIES
SUBSCRIBE TO OUR NEWSLETTER
RELATED POSTS
-
Developing an Effective Naming Convention for Google Analytics Event Tracking & Virtual Pageviews
By Mike LaLonde
This blog has been admittedly barren for over the past year, so this post is to serve as not only a resource, but also as evidence that we're still al...
continue... -
Top 3 “Must Have” WordPress Plugins for SEO
By Craig Tuttle
The incredible ease of use along with the myriad of available tools, themes, and plugins available for WordPress make it the “go-to” CMS platform ...
continue...
RELATED SERVICES
-
Web Analytics
Web analytics provide mounds of data about your visitors. Proper measurement allows you to better understand traffic source and campaign performance t...
continue... -
SEO
Organic Search Engine Optimization (SEO) is an effective long-term solution to generating sustained, targeted traffic. Through our analytical consulti...
continue...