- By: Mike LaLonde
- December 06, 2012
Using Google Tag Manager to Simplify Conversion Tracking
For whatever reason, installing conversion code (or making changes in general) to a website is often an uphill battle for marketers. It’s even more difficult if you’re working with another company or site administrator in an agency-client relationship. Getting approval from all the necessary parties, explaining what you want to accomplish, and scheduling times to not only discuss the changes but also get them implemented turns something that should only take a few minutes into a task that can drag on for days.
Don’t get me wrong – some people and companies are great to work with. I don’t want you to think I have some kind of pent-up grievance with developers and site admins in general. If anything, it just means they’re very careful. But sometimes organizational structure and chain of command can make things more difficult than they need to be. And when a way to simplify that comes along, I’m paying attention.
So when Google Tag Manager was announced, I couldn’t help but get a little excited. Not “SNOW DAY!” excited, but certainly “we’re watching a movie in class” excited. Its advertised functionality essentially makes it a section of code acting as a conditional include, managed externally (in your Google account), and installed on the client’s website. This appeals to both my focus on efficiency and my aversion to having unnecessary conversations (I’m great at parties).
One thing important to note as we get started is that this is designed for NON-VISUAL changes to a website. So we can’t (or aren’t supposed to) use it for things like performance testing or creating your own editable container on client websites.
Without further ado, here’s how it actually works:
1) Create an Account for Each Client
You can’t share tags and rules across accounts (unless you create a duplicate), but you shouldn’t really need to anyways. Creating a new “account” for each client is going to help keep you organized. Plus, if you want to give additional users access to the container, you won’t be sharing data.

2) Create a Container for Each Code Area
For basic implementation, you’re probably going to want to have code snippets either in the header or the footer. As we’ll discuss later, using rules and macros we can only conditionally show certain tags, so there is no need to create separate containers for your conversion page footer and the rest of your pages.
In all likelihood, the most you’ll need is a container for the header (for your asynchronous Google Analytics code, maybe Webmaster Tools), and one for the footer (Analytics code, conversion codes, remarketing code, etc). Since the updates are non-visual, that should take care of most of your code update needs.

3) Create Tags
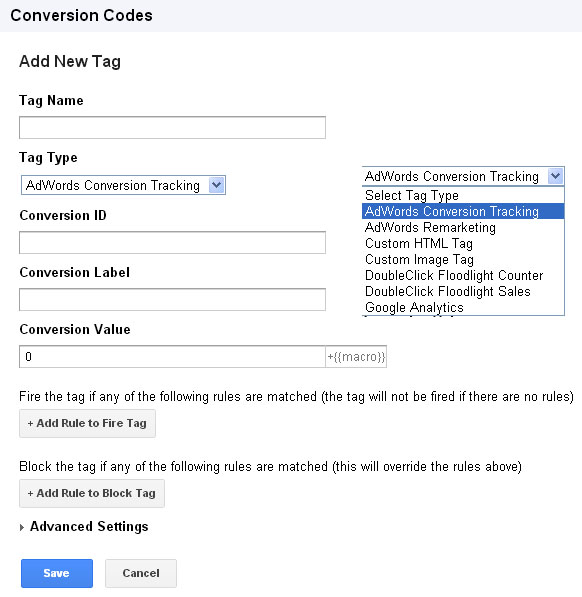
Now comes the fun part. The tags are the actual codes that will be included in your containers. Google has a preset list of tags they can help you easily create, including remarketing, conversion tracking, google analytics, and Doubleclick codes. You can also enter your own custom HTML or image tag (the image tag is meant for the 1×1 pixel tracking images).
The screenshot I’ve included is of the Google Adwords conversion, and as you can see it’s fairly straight-forward when it comes to how to actually implement it. The Conversion ID and Conversion Label you’ll find right in the code itself (which you can access in Google Adwords).
After entering in the conversion information, the last thing you need to do is enter a Rule. The default rule is All pages: {{url}} matches RegEx.* (which of course is just another way of saying all the pages). You can use that one for things such as Remarketing and Analytics. For a Webmaster Tools meta tag, you’ll just choose the home page. For conversion tracking, like we’re setting up here, we’ll have to create a new rule.
4) Create Rules
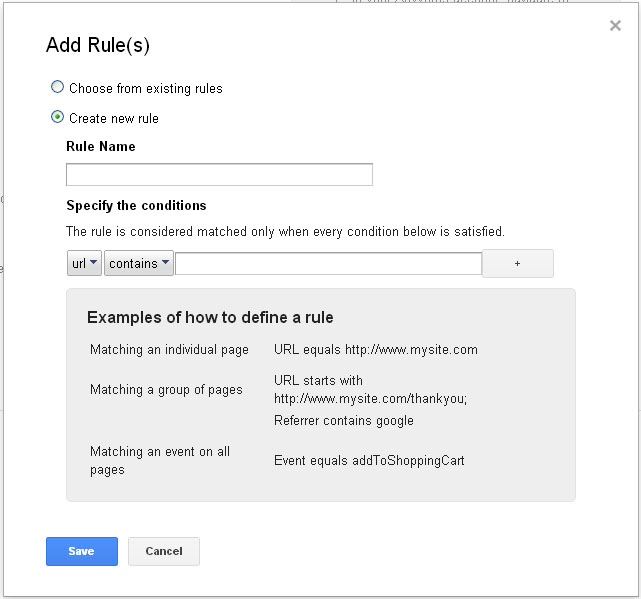
For conversion tracking, creating a rule is very similar to setting up goals in Google Analytics. Like in analytics, you can choose a destination URL (which is what we like to use), but if the website uses a reload as a conversion or tracks micro-conversion events, you can use events as satisfied conditions as well (which are macros, which we’ll get to soon).
So, if you’re setting up a thank you page, the rule you create will include a destination URL parameter, such as YourSite.com/thankyou. Save your rule and apply it to the tag so your conversion code only fires on those specific pages.
5) Create (or don’t create) Macros
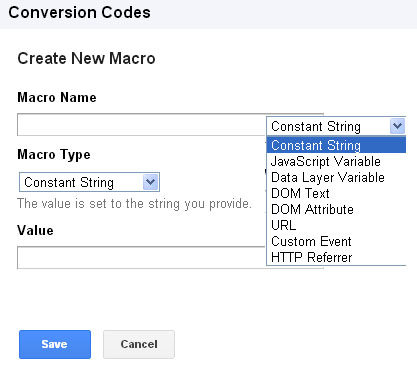
Macros provide the ability to create enhanced functionality with dynamic conditions. They create additional variables that can “speak” to each other while the code executes, allowing additional combinations of code execution and more detailed conversion tracking. If you want to dabble in macros, you’ll want to have some development experience.
For the most part, you probably won’t need to worry about macros. The ones you need are already included, namely the {{url}}, {{event}}, and {{url}} codes. Note that Macros are applied to Rules, which are then applied to Tags, so at a basic level there isn’t a direct interaction between the macro and the tag, just when the tag appears. You’ll be choosing “url” to create your rules in most cases, with a chance of using “event” if you’re interested in doing that kind of tracking.
6) Publish Your Version
This may sound obvious, but you actually need to publish the version you created. A couple problems I’ve “solved” have just been telling people that they need to publish their version in order for it to actually start working (probably because I did the same thing the first time I created one). So, before you expect it to work, make sure you pull up your complete version (in the left navigation) and hit “publish” in the upper-right so things start moving.
As an added bonus, you can save new versions of your Tag Manager account to go back and see what changes you’re making.
7) Users & Settings
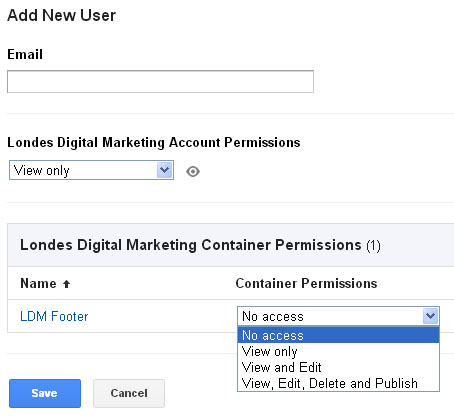
You can give other users access on a number of different permission levels. As mentioned in the container creation section, this will keep users only accessing the information you want them to see.
Permission can be given both on an account level and a container level (as shown in the diagram). You can give view only access, view and edit access, or essentially admin access to do whatever he or she pleases (view, edit, delete, publish).
As a Solution for Developers & Site Administrators
So here’s why it’s still a problem. In all likelihood, those developers and site administrators who you have to fight with for permission to install tracking codes aren’t reluctant because their obstinate in general. They’re reluctant because it’s their job to make sure the website is secure and performing as it should. You can hardly blame them for worrying if someone wants to add unfamiliar code.
They’ll soon realize that this is just making it easier for us marketers to add that code, which I imagine they won’t be thrilled about. Unless they’re sufficiently confident in the code’s ability to allow the rest of the website go unaffected, and that it doesn’t pose a security risk.
In that sense, developers might be unwilling to use the tag manager code at all. Tough luck, I know.
On the other hand, you could request that they set up Google Tag Manager themselves, then provide you with View/Edit access to the containers they create. Then, whenever you need an update, you can make the edits and installation yourself, then just submit it to the developer/admin for review. Again, this simplifies things, creates less e-mails/phone calls/confusion going back and forth, and also allows you to use the manager in an efficient way.
So if you’re a developer dealing with a marketing company, this might be something you’d like to implement. Let them edit and customize the container as they please, and you get to review it before it goes live. Win-win!
As a Solution for Established Relationships
Google Tag Manager is very useful (from an agency perspective) when you have an established relationship with a client, and their development team is confident you are competent enough to hand installing conversion codes successfully. In these cases, it expedites the process for you, and makes everyone life a bit easier since you can just make the updates. As general practice, it might be a good idea to notify them when you’ve made an update as well.
When it comes down to it, if the client trusts you with their code and website, they’ll probably trust you to implement Google Tag Manager directly as well.
As a Solution for In-House Teams
Similar to the solution I recommended for developers and site administrators, Google Tag Manager can help members of a team work independently before bringing the final product together. With the likely setup that the website administrator wants to control all the code edits, he/she can set up the Tag Manager with view/edit access to the marketing team. The marketing team can update as they please, then get it approved before publishing and going live.
Again, it just improves the communication flow and organization of the process. Facilitated by a trusted provider (Google), everything is stored centrally, version-controlled, and accessible by many different individuals in your organization. No trading e-mails back and forth or problematic code formatting.
Try It!
The best way to get started is on your own website. Something simple like your Analytics footer code. It’s probably the easiest to set up in Google Tag Manager, plus it makes for a simple code swap once set up. Get that functioning properly, then go from there as you get more comfortable.